Your Apple ID keeps you connected to the ever-growing Apple services that include Apple Pay, iCloud, Apple Music, iTunes, App Store, etc. It is possible to change the Apple ID that’s associated with your iPhone, iPad or iPod touch. Some of the reasons why people change their Apple ID include:
- Creating a new Apple ID to test other software
- Giving an Apple device to a friend or family member
- Preference – just opting to create a new Apple ID

However, it is important to understand that when you create a new Apple ID, you will no longer be able to access the content you purchased using the previous ID.
Steps to take to change your Apple ID
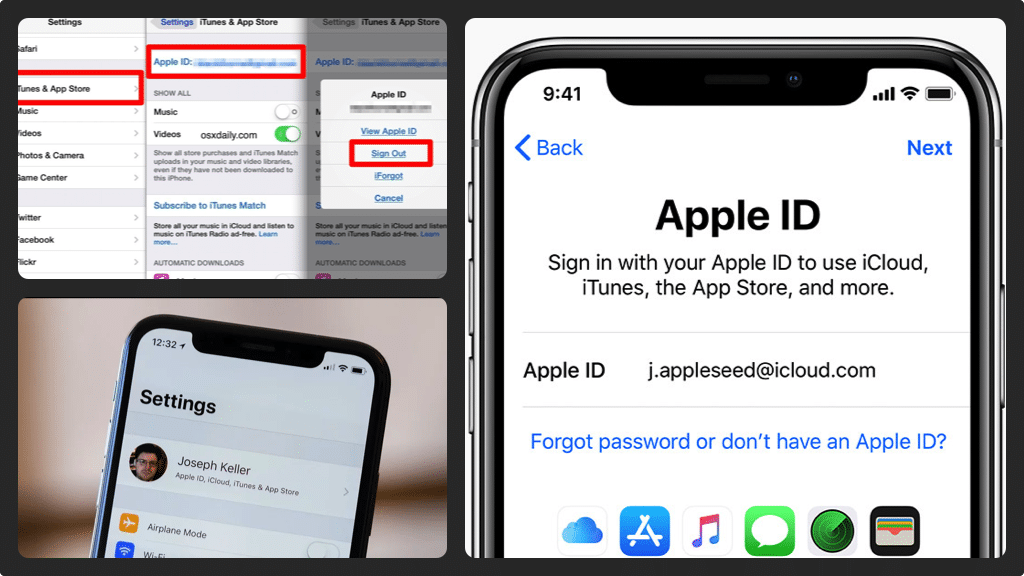
- To land on the appropriate Settings screen, tap the ‘Settings’ app.
- At the top of the Settings screen, tap the row that includes your name and profile picture. You will see an Apple ID screen.
- Sign in by entering the password that’s associated with the current Apple ID. If Find My iPhone or iPad is enabled, tap ‘Turn Off’ to proceed. You will see a ‘Keep a Copy of Your Data on This iPhone or iPad’ screen. You will see a screen that inquires if you wish to keep a copy of the device’s information and that the data will be available in iCloud even if it is removed.
- In the upper right corner tap ‘Sign Out’ and confirm by tapping the red ‘Sign Out’ option. You will see a white screen ‘Copying iCloud Data’ for keeping vital information on iCloud. The amount of time this takes depends on the amount of data on your device. Since you’ve removed the associated Apple ID, you will notice that no account’s signed in to your device.
- At the top of the screen, tap ‘Sign in to your iPhone or iPad’ and an Apple ID screen will appear.
- Enter the email address that’s associated with the Apple ID you wish to switch to on your device.
- You will see a password field just beneath the email address. Enter the password that’s associated with the e-mail and then tap ‘Next’ in the upper right-hand corner of the screen. Before you land on the Terms and Conditions screen, you will see a signing in to iCloud briefly.
- In the lower right corner of Terms and Conditions, tap the blue ‘Agree’ button and you will see a dialog box asking if you agree with the Terms and Conditions. Tap the ‘Agree’ button again to confirm. You will see a signing-in to iCloud screen again. Then a menu will pop from the bottom of the screen informing you that your data for the News app, contacts, reminders, calendars, and safari will be uploaded and merged with iCloud. You have the freedom of choosing whether or not to merge the data. After the data has been uploaded to iCloud, you will return to your Settings screen automatically. The new profile picture and name associated with the new Apple ID will be displayed toward the top of the screen.
- If you have other Apple devices, you need to sign out of your Apple ID and then use your new Apple ID to sign back in.

