• 💻 Mac
  • 📱 iPhone
  • 📒How To’s
  • 👨‍💻 Software
Menu
  • 💻 Mac
  • 📱 iPhone
  • 📒How To’s
  • 👨‍💻 Software
Home»Tips & Tricks»How to Delete All Alarms in the Clock App on iPhone
Tips & Tricks

How to Delete All Alarms in the Clock App on iPhone

Elliot V. KingBy Elliot V. KingJune 21, 2022No Comments5 Mins Read
Facebook Twitter LinkedIn Telegram Pinterest Tumblr Reddit Email
How to Delete All Alarms in the Clock App on iPhone
Share
Facebook Twitter LinkedIn Pinterest Email

Do you remember turning off your bedtime alarm on weekends so that you could sleep for some extra hours? I know I don’t, and that’s why I understand that it’s extremely frustrating when the alarms keep ringing until you turn all the alarms off manually.

The stock Clock app on your iOS device allows you to set multiple alarms at a time. Just like every second person, you might also tend to add more alarms instead of editing or clearing the older ones.

So, how do you cancel all alarms on iPhone when needed? Luckily, your iPhone allows you to delete all your alarms at a time instead of clearing individual alarms one by one.

Here we will guide you through different ways of canceling, deleting, and editing multiple alarms at the same time. So without further ado, let’s dive in.

Table of Contents

  • How to Cancel All Your Alarms on Your iPhone?
    • Method One – Cancel All Your Alarms with Siri
      • Step 1
      • Step 2
      • Step 3
    • Method Two – Ask Siri to Delete All Your Alarms
      • Step 1
      • Step 2
      • Step 3
    • Method Three – Delete an Alarm Individually

How to Cancel All Your Alarms on Your iPhone?

There are not only one but multiple ways of clearing your alarms from the iPhone alarm app. For most people, the easiest way is to activate Siri to take care of this job. You also have the option to open the app and manually work on every single alarm.

Or, you can disable the alarm clock for a while. Below we have listed all the methods of removing all your alarms. Check them out and pick one that you find convenient.

Method One – Cancel All Your Alarms with Siri

Unfortunately, there’s no way to use your Clock app and delete the alarm just in one fell swoop. But hey, this doesn’t mean you can’t do it at all. The trick is to take help from Siri to cancel all the active alarms on the Clock app.

Here’s a step-by-step process of turning off your alarms –

Step 1

First, you need to activate Siri on your iPhone or iPad. Simply say ‘Hey Siri,’ and it will be activated instantly. Otherwise, you can turn it on manually. Press and hold your Home button (for iPhone) or Side button (for iPad). Once Siri is activated, proceed to the next step.

Step 2

Now, give a proper command to cancel your alarm. Simple say, ‘Turn off all my active alarms’ or ‘Cancel all my alarms.’

Step 3

When the process is done, Siri will inform you by announcing the cancellation. If you don’t hear something like ‘I canceled all of your active alarms,’ try repeating the process.

Note that Siri will only cancel your alarms instead of deleting them. This means you can reset the alarms whenever you want.
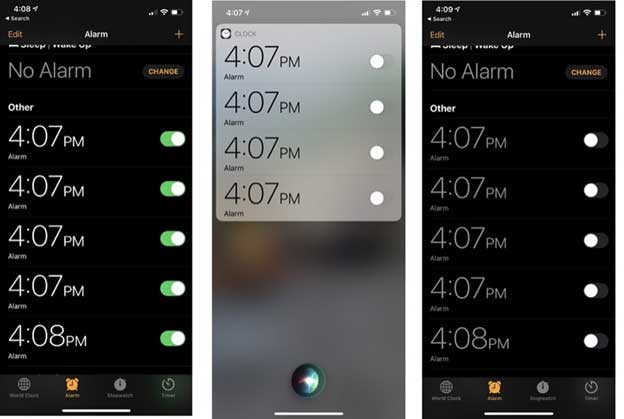
Cancel All Your Alarms with Siri

Method Two – Ask Siri to Delete All Your Alarms

When you disable or cancel your alarms, only your active alarms are canceled for the day, and they might turn on the next day at their scheduled time. So, if you want to get rid of all the alarms at once, you need to delete them from the Clock app. And here’s how you do it –

Step 1

Open Siri by saying ‘Hello Sirion’ or ‘Hey Siri.’ Once it’s activated, give a proper command like ‘Hey Siri, delete all alarms on my phone’ or ‘remove all my alarms.’

Step 2

Siri will ask for your final confirmation by saying something like, ‘Do you really want to delete all of your alarms?’ Reply by saying ‘Yes’ or confirm by tapping on ‘Yes’ on your phone screen.

Step 3

Once the process is done, Siri will confirm you by saying, ‘Okay, no more alarms.’
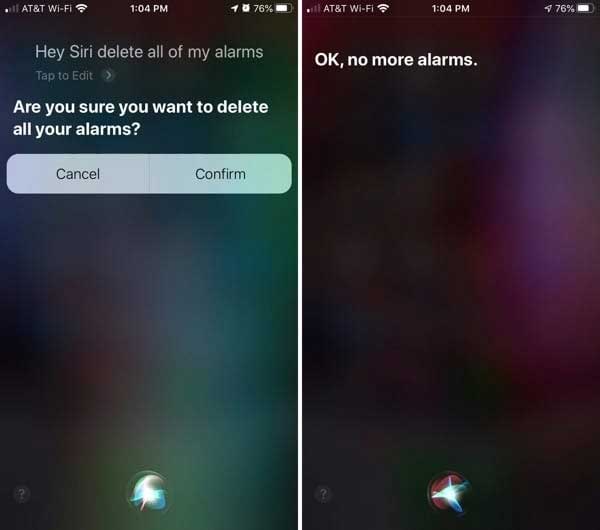
Ask Siri to Delete All Your Alarms

Method Three – Delete an Alarm Individually

While using Siri to clear your alarm is the most effective way, sometimes it might not work at all. It happens when you have way too many alarms on your Clock app. In that case, Siri will respond by saying, ‘Sorry, something went wrong. Try again later.’

So, now you have to delete each alarm individually. To do so, choose any of the easy processes given below –

  • From your iPhone home screen, go to the Clock application. Then choose an alarm you want to delete, tap on it, and swipe left to delete the alarm permanently.
  • Tap ‘Edit,’ and you’ll see a minus sign next to the alarm. Select it and tap ‘Delete’ to get rid of the alarm.
  • Choose the ‘Edit’ option and select the alarm you want to delete from the list. Then simply tap ‘Delete Alarm.’
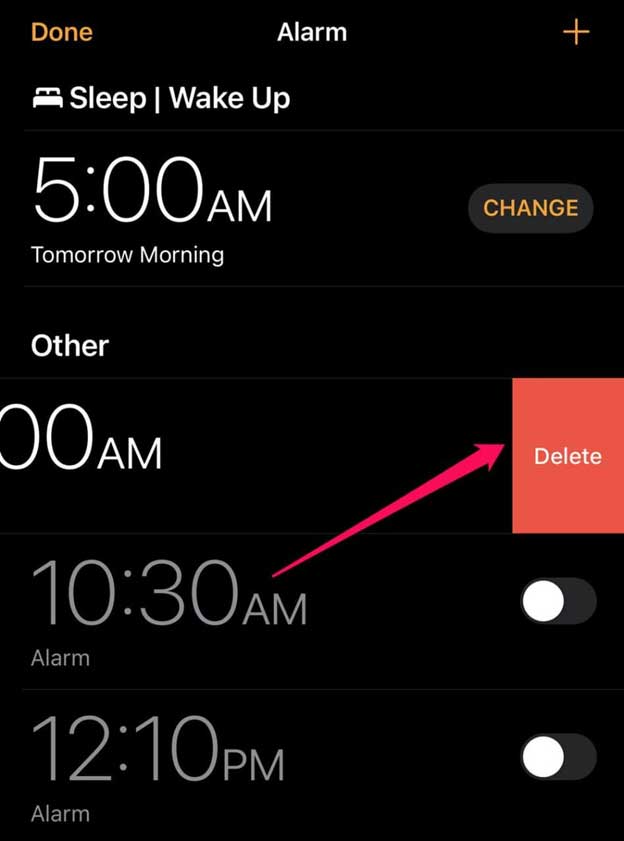
Delete an Alarm Individually

Final Words

So now you know how to cancel all alarms on your iPhone. As you have seen, the process of getting rid of all your alarms at once is very simple and takes only a minute. Just ask Siri to do the job for you, and that’s it.

However, if nothing else works, you can delete the alarms individually or disable the Clocks apps from your settings. For any kind of query, you can also visit the official Apple Support website.

Share. Facebook Twitter Pinterest LinkedIn Tumblr Email
Elliot V. King

Elliot Victor King is a Tech Enthusiast from Salt Lake City with years of experience in building websites. Having been involved with Mobile Technology and Computers from an early age, Elliot's Mission at MacCrunch.com is to evolve the Website to new levels by contributing helpful content for our readers to enjoy and learn from. To contact Elliot send an email to [email protected]

Related Posts

The Best Sites for Downloading GBA ROMs

June 10, 2023

Is Pogo Safe? The Truth About Pogo Games Viruses

June 10, 2023

Fixing Expired Printer Encryption Credentials Expired on macOS: A Tutorial

April 28, 2023

How to Win at 8 Ball on iMessage: Tips and Tricks

April 22, 2023

How to Stream Music Not Available in Your Country on Apple Music

March 30, 2023

iPad Home Button Not Working? Here’s What to Do

March 23, 2023

Leave A Reply Cancel Reply

one × 1 =

This site uses Akismet to reduce spam. Learn how your comment data is processed.

💎 Subscribe to our YouTube Channel!

👋🏼Make sure you're Subscribed!
📥Subscribe to Blog via Email

Sign up via email to become a VIP reader and receive updates on new Downloads and the Latest Apple News straight to your Inbox!

📚 Translate
⚖️ Legal
Copyright © 2007-2020 MacCrunch.com - All content is copyrighted and intellectual property of Avenir Media LLC and may not be reproduced or copied on and by other websites

All product names, logos, and brands are property of their respective owners. All company, product and service names used in this website are for identification purposes only. Use of these names, logos, and brands does not imply endorsement.

**Please note that we are in no way affiliated with Apple Inc. Therefor we cannot access your AppleID account, reset your password, Activation Lock etc.** All advertised 3rd party software advertised belongs to its copyright holder and has no association with MacCrunch.com

MacCrunch.com is an independent blog and not affiliated by Apple, Inc. We do not sell or host jailbreak services or tools. We link to official sources only.

MacCrunch does NOT host any data, we link to files on 3rd party sites ONLY. No uploads are stored on our servers but rather users link to other site which contain the requested file. We are a link aggregator only. We do not sell or host files, services or tools. We link to official sources only. We are not affiliated with any trademarks mentioned by any user
Categories
  • Android (10)
  • Apple News (13)
  • Apps (24)
  • Business (1)
  • Downloads (3)
  • Entertainment (31)
  • Featured (38)
  • FinTech (4)
  • Games (2)
  • Gaming (5)
  • General (11)
  • Google (4)
  • How To's (56)
  • iOS (28)
  • iPad (7)
  • iPhone (48)
  • Mac (19)
  • Must Read (2)
  • Reviews (14)
  • Shopping (1)
  • Smart Home (7)
  • Social (21)
  • Software (15)
  • Tech (2)
  • Technology (2)
  • Tips & Tricks (45)
  • Uncategorized (2)
  • Unlock iCloud (9)
  • Windows (6)
  • Watch (5)
Tags
activation lock add advanced cmd hacking commands amazon android apple apple id Apple M1 audible best connect control delete download echo facebook Facebook messenger fb Fitbit fix iphone headphone jack free google how to how to change language on netflix imessage not working on ipad ios ipad iphone iphone headphone jack link mac macbook macbook pro Netflix netflix change language osx pair PayPal remove review tutorial xbox xbox live xbox one youtube
Don't Miss
Entertainment

Watch Movies and TV Shows: Top 15 Los Movies Alternatives in 2023!

By BrandonSeptember 25, 2023

So, you’ve stumbled upon this page because, like many, you’re on the hunt to watch…

Best Free Sports Streaming Sites of 2023: Top 20 That You Can Rely On!

September 21, 2023

Where to Watch Anime Now? Top 17 KissAnime Alternatives Dominating 2023!

September 17, 2023

Top 14 Best Putlocker Alternative Sites to Watch Movies Online in 2023

September 13, 2023
Our Picks

Watch Movies and TV Shows: Top 15 Los Movies Alternatives in 2023!

September 25, 2023

Best Free Sports Streaming Sites of 2023: Top 20 That You Can Rely On!

September 21, 2023

Where to Watch Anime Now? Top 17 KissAnime Alternatives Dominating 2023!

September 17, 2023

Top 14 Best Putlocker Alternative Sites to Watch Movies Online in 2023

September 13, 2023
  • About us
  • Contact us
  • Write for us
  • Affiliate/Advertising Disclaimer
  • Terms of Service
  • Privacy Policy
  • DMCA
Menu
  • About us
  • Contact us
  • Write for us
  • Affiliate/Advertising Disclaimer
  • Terms of Service
  • Privacy Policy
  • DMCA

Copyright © 2007-2021 MacCrunch.com – All content is copyrighted and intellectual property of Avenir Media LLC and may not be reproduced or copied on and by other websites

All product names, logos, and brands are property of their respective owners. All company, product and service names used in this website are for identification purposes only. Use of these names, logos, and brands does not imply endorsement.

**Please note that we are in no way affiliated with Apple Inc. Therefor we cannot access your AppleID account, reset your password, Activation Lock etc.** All advertised 3rd party software advertised belongs to its copyright holder and has no association with MacCrunch.com

MacCrunch.com is an independent blog and not affiliated by Apple, Inc. We do not sell or host jailbreak services or tools. We link to official sources only.

 MacCrunch does NOT host any data, we link to files on 3rd party sites ONLY. No uploads are stored on our servers but rather users link to other site which contain the requested file. We are a link aggregator only. We do not sell or host files, services or tools. We link to official sources only. We are not affiliated with any trademarks mentioned by any user

Type above and press Enter to search. Press Esc to cancel.


Loading Comments...